-
Shop
- Adidas
- Advanced Technologies
- AI Skills
- Armani Fashion
- Beauty
- Best Sellers
- Calvin Klein Fashion
- Car Accessories
- Car Buying & Ownership
- Car Electronics
- Confidence
- Dating & Social Skills
- Denim
- 7FOR
- AGOLDE
- Antony Morato
- Armani Exchange
- Boss
- Brunello Cucinelli
- Calvin Klein Jeans
- Costume National
- Desigual
- Diesel
- Dolce & Gabbana
- Dsquared²
- Ermanno Scervino
- Fendi
- Gianni Lupo
- Guess Jeans
- Ichi
- Just Cavalli
- Lee
- Levi's
- Liu Jo
- Morgan De Toi
- Mother Denim
- Only
- Pepe Jeans
- Pinko
- Replay
- Tommy Hilfiger Jeans
- Valentino
- Vero Moda
- Education & Learning
- Family & Parenting
- Fashion
- Alexander McQueen
- Bags
- Bags & Wallets
- Balenciaga
- Belts
- Blazers
- Blouses & Shirts
- Bottega Veneta
- Brunello Cucinelli
- Burberry
- Chanel
- Chloé
- Dior
- Dolce & Gabbana
- Dresses
- Etro
- Gucci
- Hats & Hair Accessories
- Hoodies & Sweatshirts
- Jewelry
- Jil Sander
- Jimmy Choo
- Keychains
- Kiton
- Luggage
- Luggage Bags
- Miu Miu
- Off-White
- Outerwear
- Prada
- Rick Owens
- Saint Laurent
- Shoe Accessories
- Socks & Tights
- Sunglasses
- Sweaters & Cardigans
- The Row
- Tom Ford
- Valentino Garavani
- Versace
- Vivienne Westwood
- Watches
- Fashion Accessories
- Financial Education
- Furniture
- Furniture & Decor
- Gadgets
- Gadgets & Electronics
- Guess Fashion
- Health & Beauty
- Health & Wellness
- Home & Garden
- Home Styling & Organization
- Home Supplies
- Interior Accessories
- Kids & Babies
- Kitchen & Dining
- Lighting
- Mindset
- Nike
- Outdoors
- Parenting & Child Development
- Patio, Lawn & Garden
- Personal Growth
- Personal Style & Fashion
- Pet Care
- Pet Lifestyle & Wellness
- Pet Supplies
- Pets
- Road Trip Accessories
- Shoes
- Special Deals
- Sport & Outdoors
- Storage & Organization
- Summer 2025 Fashion Collection
- Super Deals
- Tommy Hilfiger Fashion
- Travel
- Travel & Adventure
- Wealth
- Wealth Building
- Budgeting & Saving
- Cryptocurrency Investing
- Debt Management
- Entrepreneurship & Business Growth
- Family Finance & Budgeting
- Financial Independence
- Financial Mindset & Psychology
- Financial Planning
- Frugal Living & Expense Hacks
- Goal Setting
- High-Income Skills
- Investing Basics
- Leadership
- Networking & Mentorship
- Passive Income Strategies
- Real Estate Investing
- Side Hustles
- Stock Market Investing
- Wellness
- Winter Fashion
- YouTube Shorts Best-Sellers
- Popular
- Best deals
Harness Weight Sled Training: Build Speed, Power, Strength
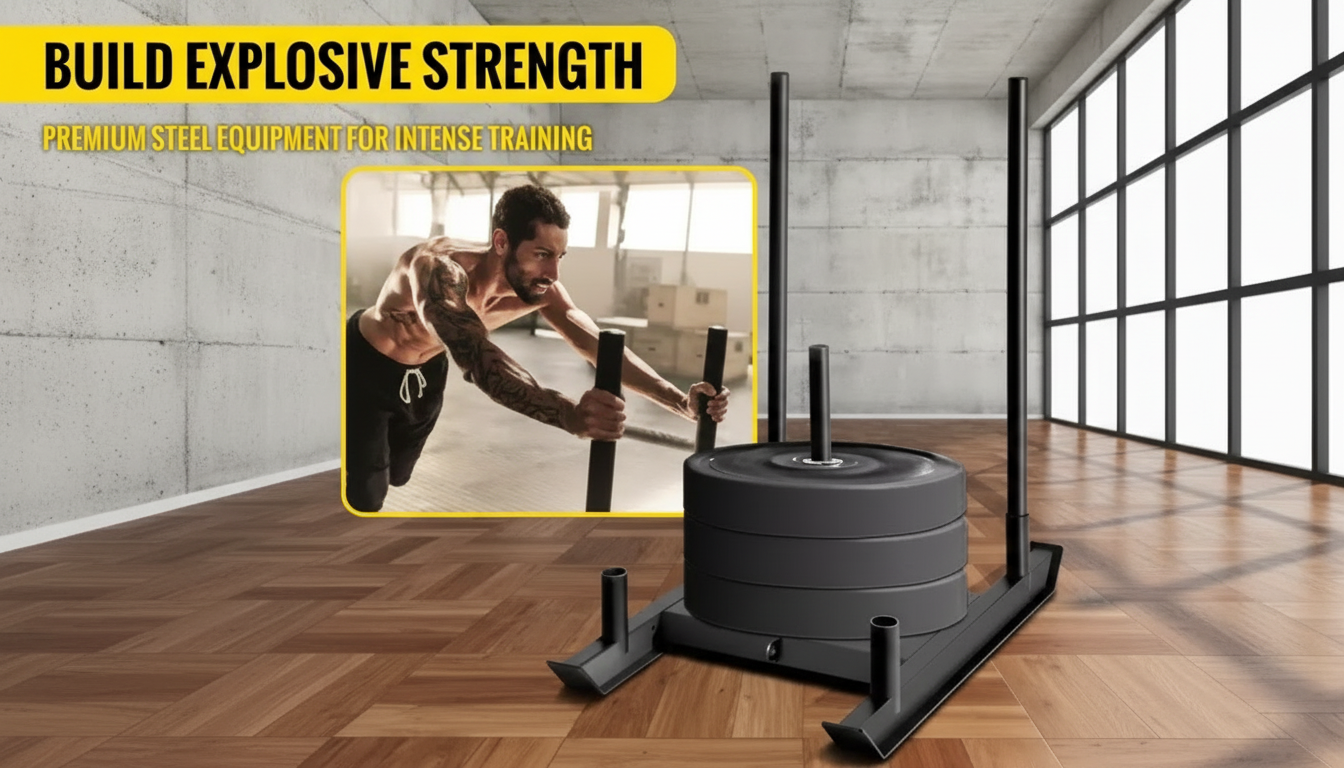
Weight Sled with Harness for Power, Speed, and Strength Conditioning
A weight sled with harness adds controllable resistance to sprint work, acceleration drills, and total-body strength conditioning. By loading the sled and driving through the harness, training can target powerful hip extension, stronger leg drive, and better work capacity while keeping movement patterns athletic and repeatable.
What a harness sled changes in training
- Builds acceleration mechanics by encouraging a strong forward lean, active arm drive, and powerful ground contacts.
- Develops lower-body strength endurance through repeated high-force steps rather than isolated reps.
- Improves conditioning with low-impact resistance that can be progressed by load, distance, or rest intervals.
- Creates a clear feedback loop: if posture collapses or stride shortens, the load is likely too heavy or fatigue is too high.
Compared with “free” sprinting, a harness keeps the resistance consistent rep to rep, which makes it easier to track performance and keep effort honest. For coaches, it’s a simple way to teach athletes what strong shin angles and committed hip drive should feel like.
Who benefits most
- Field and court athletes: improves first-step quickness, repeat sprint ability, and the strength base that supports change of direction.
- Strength-focused trainees: adds loaded concentric leg work that complements squats, deadlifts, and lunges without needing maximal spinal loading.
- Teams and coaches: quick setup for groups, measurable progress via load and time, and easy scaling for mixed ability levels.
- General conditioning: effective interval work with less joint pounding than longer runs.
It’s also a useful bridge for return-to-training phases when controlled resistance and shorter distances are preferable to high-volume running.
Key parts to look for in a weight sled with harness
- Harness comfort and adjustability: padded contact points and a secure fit reduce slipping and let you drive hard without the harness riding up.
- Connection hardware: a sturdy strap and reliable attachment points help maintain a consistent pull angle and smooth tension.
- Load capacity and stability: a base that stays planted and tracks straight helps keep mechanics clean (especially when fatigue rises).
- Surface compatibility: turf, rubber, and asphalt each change friction. Plan loads and distances based on where you’ll train most.
- Portability: a manageable footprint for storage and transport makes it more likely you’ll actually use it every week.
For programming guidance rooted in established strength and conditioning principles, see resources from the NSCA and ACSM.
Sample workouts for power, speed, and conditioning
- Acceleration focus (heavy): 6–10 x 10–20 m, full recovery; load heavy enough to slow down noticeably while keeping posture strong.
- Speed-strength (moderate): 8–12 x 15–25 m, 60–120 s rest; aim for crisp, fast steps without grinding.
- Conditioning intervals (light): 10–20 minutes of 15–30 s work / 30–60 s rest; keep technique consistent.
- Strength finisher: 4–6 rounds of 20–40 m sled pull + 8–12 push-ups or 10–15 kettlebell swings, 60–90 s rest.
- Progression options: add 5–10% load, add 1–2 reps, shorten rest, or increase distance—change only one variable per week.
Quick guide: load, distance, and goal
| Goal | Typical feel | Distance | Rest | Notes |
|---|---|---|---|---|
| Acceleration power | Very challenging; steps stay forceful | 10–20 m | 2–4 min | Stop a set if posture collapses or stride turns into shuffling. |
| Speed-strength | Fast but resisted | 15–25 m | 60–120 s | Maintain quick contacts; reduce load if cadence slows too much. |
| Conditioning | Sustainable; breathing drives effort | 20–40 m or timed | 1:1 to 1:2 | Keep shoulders down and hips driving forward for every rep. |
| Technique base | Light; crisp mechanics | 10–15 m | 60–90 s | Great for warm-ups and return-to-training phases. |
Safety, form cues, and common mistakes
- Form cues: slight forward lean from the ankles, ribs down, hips driving through, arms active and coordinated.
- Start each rep smoothly: avoid yanking the sled; build tension in the strap, then accelerate.
- Keep steps under the hips: overstriding often appears when load is too heavy.
- Use consistent surfaces: sudden friction changes can spike effort and disrupt mechanics.
- Common mistakes: too much load too soon, rounding the upper back, letting the harness ride up, and turning every session into an all-out grind.
A good rule: the sled should challenge you, but your movement should still look like sprint mechanics—not a slow, choppy march. When technique breaks, the set is over.
Where this sled fits in a weekly plan
Product options in stock
- Weight Sled with Harness – Power Speed Training Sled for Strength & Conditioning: a practical setup for resisted sprinting, strength conditioning, and interval work with adjustable loading and harness pulling.
- Infrared Sauna for One Person: a recovery-focused add-on that can support relaxation routines on high-output training weeks (sleep, hydration, and mobility still do the heavy lifting).
FAQ
How heavy should a sled be for speed training?
Use a load that preserves sprint mechanics: posture stays strong, steps stay quick, and the pull feels resisted but not grinding. Heavier loads work best for short acceleration reps, while lighter loads fit speed-strength and conditioning intervals.
Can a weight sled be used on grass, turf, or asphalt?
Yes, but friction changes the effort dramatically. Start lighter on rougher surfaces, keep distances shorter until you learn the feel, and avoid surfaces that cause snagging or unpredictable tracking.
Is sled pulling good for strength if squats and deadlifts are already in the program?
It complements barbell lifts by adding repeated concentric leg drive, reinforcing athletic posture, and building work capacity without as much spinal loading. If recovery becomes an issue, separate heavy sled days from the hardest lower-body lifting sessions.


